How to apply for an India e-visa for Filipinos: step-by-step guide
I spent 60 days in India, and the journey started with the India e‑Visa for Filipinos. The application has nine pages, but don’t worry, I’ll walk you through each step so you can fill it out smoothly, avoid mistakes, and get your visa approved within 72 hours.
Step 1: Prepare the requirements for India e-visa for Filipinos
Valid passport: Must be valid for at least 6 months from your arrival date in India, with 2 blank pages. Carry a photocopy of the bio-data page.
Digital passport photo: Recent passport-style photo with white background, uploaded online.
Passport bio page scan: High-quality color scan of the biographical data page.
Return or onward ticket: Immigration officers often ask for proof of onward travel. Keep a printed copy or screenshot. (? Book cheap flights here).
Proof of accommodation: Hotel booking confirmation or invitation letter from host. Rarely checked, but recommended. (? Book accommodations here)
Proof of funds: Bank statement or credit card showing sufficient funds. Not always checked, but useful.
Valid email address: To receive your approved e-Visa (ETA).
Payment method: International credit or debit card to pay the visa fee around $25 (₱1,500) to $80(₱4,800) depending on visa type.
Travel insurance(recommended): Covers medical emergencies, trip cancellations, and belongings. (? Get travel insurance here)
Step 2: Fill out the online application form
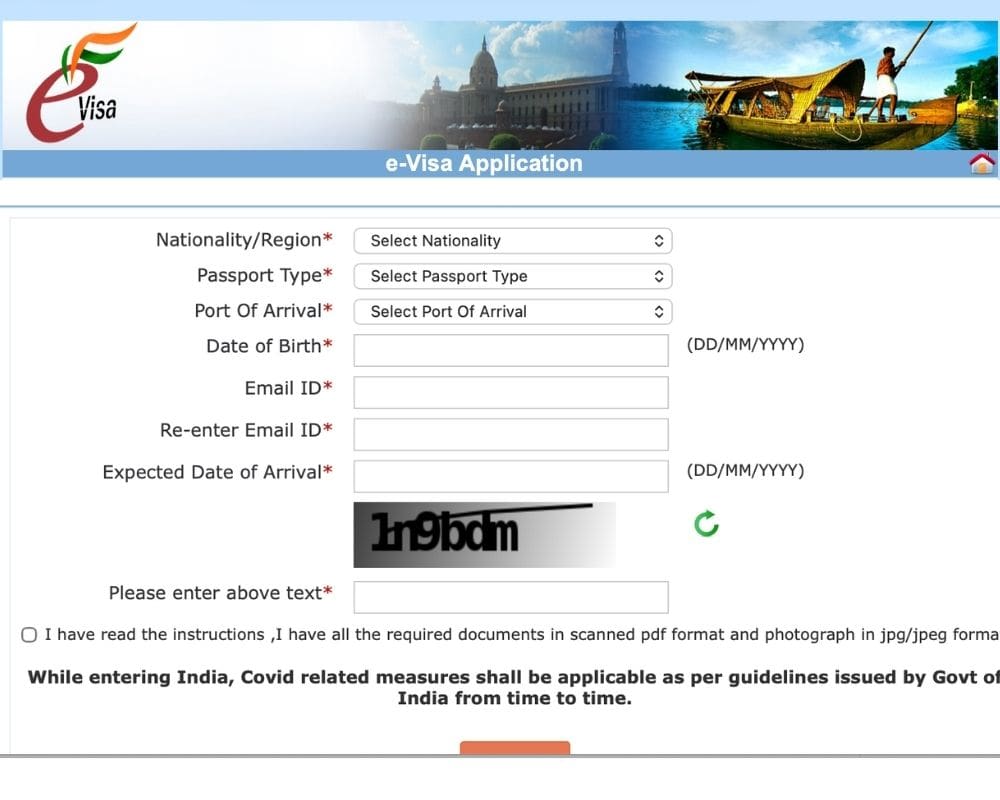
To begin your India e-Visa for Filipinos application, visit the official portal. When you reach the India e‑Visa landing page, scroll down and hit “Apply here for e‑Visa.”
The India e‑Visa application for Filipinos consists of nine pages, so take your time and complete each one carefully. Ensure that every detail you enter matches exactly with the passport you will use to travel to India, as even small discrepancies can cause delays or rejection.
Here is the page summary:
Applicant Details: Fill in your name, birth details, nationality, religion, and education exactly as shown in your passport. Accuracy matters! ?️
Passport Details: Enter your passport number, issue/expiry dates, and place of issue. Double‑check every digit before moving forward. ?
Address & Family Info: Provide your home address, parents’ names, and spouse details if applicable. Keep it consistent with official records. ????
Occupation Details: List your current job, employer, and profession category. Be truthful — this section helps verify your background. ?
Travel History: Declare countries visited in the last 10 years, past Indian visas, and any refusals. Transparency avoids issues later. ?✈️
Visa Details: Choose your visa type (tourist, business, medical, etc.), purpose of visit, and expected arrival port/date. ?
Additional Questions: Answer security questions about criminal history, military service, or restricted regions honestly. ?
Document Upload: Upload a recent passport photo and a clear scan of your passport bio page. Ensure files meet size and format rules. ??
Review & Payment: Check all details carefully, pay the visa fee online, and submit. Your ETA will arrive by email within 72 hours. ??
Step 3: Wait for ETA
After submitting your application and payment, wait for your Electronic Travel Authorization (ETA) to arrive by email. Processing usually takes up to 72 hours, though approvals can come sooner. Keep checking your inbox (and spam folder) to ensure you don’t miss it.
Once you arrive in India, you must show your Electronic Travel Authorization (ETA) to the immigration officer at the airport. The officer will then place an e‑Visa stamp in your passport, which officially activates your visa.
The stamp is valid for 60 days starting from the date of your first arrival in India.
You can use it for multiple entries within that 60‑day period, depending on your visa type.
Without presenting the ETA, immigration cannot endorse your passport, so always carry both the printed ETA and your passport together.
Resources for India e-visa for Filipinos
When I applied for the India e‑Visa for Filipinos, I made sure to use legit, trusted websites for the required documents:
Booking.com — Immigration requires proof of accommodation. Booking.com is a reliable site where I got my hotel confirmation to attach to the application. ?
WayAway — A flight booking is also required. WayAway is a trusted flight search platform that gave me legit tickets to show my travel dates. ✈️
SafetyWing— Travel insurance isn’t mandatory but highly recommended. SafetyWing is a reputable provider that covered me during my 60‑day stay. ?️
Wise — If Filipino debit or credit cards don’t work for the online payment, Wise is a trusted option to handle international transactions smoothly.
FAQ: India e-visa for Filipinos
Can Filipinos get a visa on arrival in India?
No. India does not offer visa on arrival for Filipino citizens. You must apply online for an e‑Visa before traveling.
Is India now visa free for Filipinos?
No. Filipinos still need a visa to enter India. The easiest option is the e‑Visa, which can be applied for online. It’s really quick and easy!
How much is an Indian e-visa for Filipinos?
The fee ranges from $25 (₱1,500) to $80(₱4,800), depending on the visa type and duration. Payment is made online by card.
How long does it take for an India e-visa for Filipinos to be approved?
Processing usually takes 24 to 72 hours. The approved Electronic Travel Authorization (ETA) is sent by email.
Do I need a travel agent or can I apply myself?
You can apply yourself directly on the official portal. It’s designed for DIY applications. Travel agents are not required, though some offer services for convenience. Using the government site ensures you pay only the official fee.